
Feature
Point the Filter Arrow Toward the Blower—Whatever the System Layout
By Mara Keene · HVAC Lens editorial · · 16 min read
- Published
- 2026-08-04
- Last revised
- —
- Filed under
- Feature
- Length
- 3,538 words
- Read time
- 16 min
- Review status
- Editorial
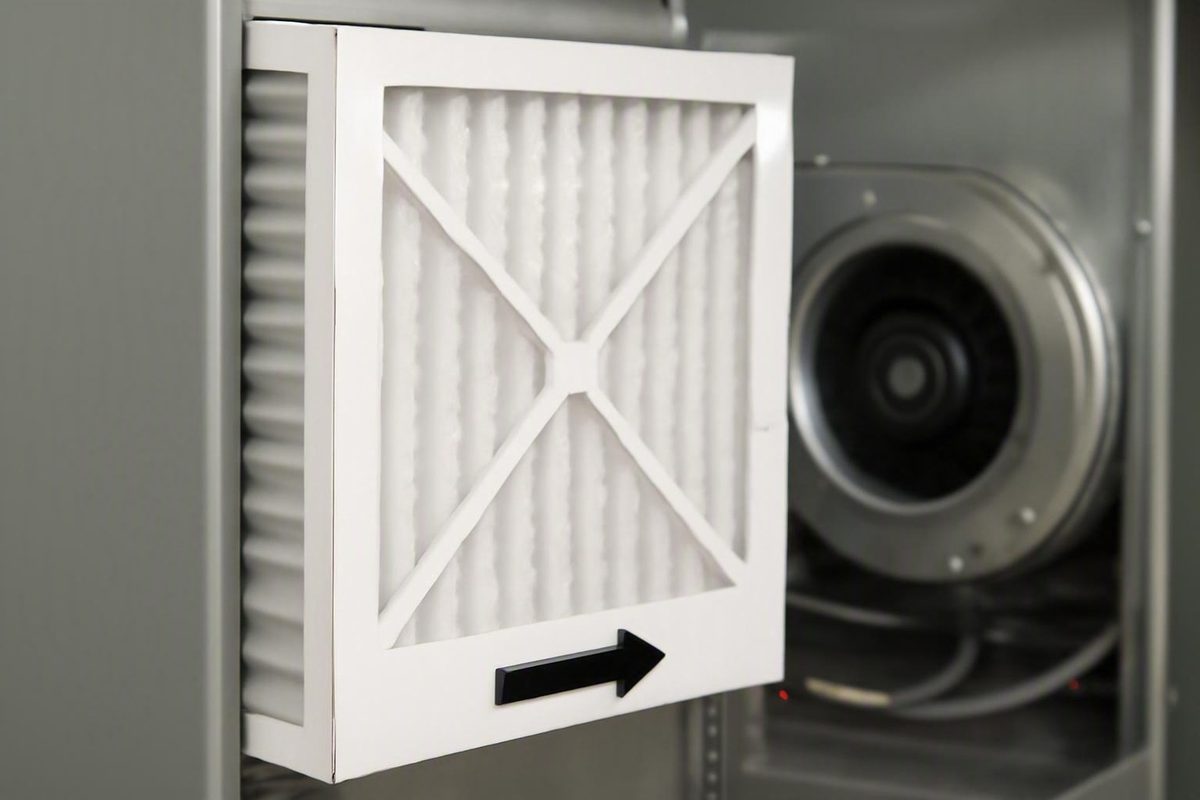
The Short Answer: The Arrow Points Toward the Blower
Point the filter’s printed AIR FLOW arrow toward the blower or air handler. In a normal return-side installation, the arrow points away from the room or return-air source and downstream toward the equipment.
“Point it toward the furnace” is useful shorthand when the filter sits beside a conventional furnace. The more precise rule is toward the blower or air handler, because the filter may be behind a remote return grille or paired with equipment that is not technically a furnace. The arrow follows airflow from the return side into the equipment (furnace-filter direction guidance).
The basic airflow path is:
Occupied room
    ↓
Return grille or return duct
    ↓
Filter
    ↓
Blower or air handler
    ↓
Supply ducts and registers
    ↓
Occupied rooms
The arrow identifies the direction in which air should pass through the filter. It does not identify which physical edge belongs on top. Depending on the system, a correctly installed arrow may point:
- Up
- Down
- Left
- Right
- Into a wall
- Into a ceiling
- Down into a floor duct
That is why gravity, brand-name orientation, and generic advice such as “the arrow always points up” are unreliable.
Use this memory aid:
Follow the return air toward the blower.
Do not assume that every filter has a readable arrow. When an arrow is present, follow it. When it is missing, faded, or hidden, use the filter instructions, cabinet markings, equipment manual, and externally visible return-to-blower path rather than guessing from the filter’s appearance.
Find the Filter and Trace the Return-Air Path
Before deciding which way the filter faces, identify where it sits in the airflow path. A residential filter intended for routine homeowner replacement may be located:
- Behind a hinged wall return grille
- Behind a ceiling return grille
- Beneath a floor return grille
- In a narrow return-duct slot near the equipment
- In a dedicated media cabinet attached to the return side of a furnace or air handler
- In another routine-access location associated with the blower compartment
These locations and the general return-to-equipment airflow path are described in Aerterra’s filter-location guide.
This guidance applies only to filters specifically designed for routine user access. Do not remove internal service panels merely to locate a filter.
Identify the return side
A return grille draws room air into the HVAC system. Some homes have one large central return; others have several.
Grille size is only a clue. A large grille does not prove that it contains a filter, and appearance alone does not establish where the duct leads.
Use these indicators in order:
- The AIR FLOW arrow on the filter frame. Follow this marking when it is readable.
- A direction label on the filter rack or cabinet. It may say “AIRFLOW,” “RETURN,” or display an arrow.
- Visible duct routing outside the cabinet. Trace the return duct from the living space toward the equipment.
- The equipment manual. Search using the complete model number if the markings and visible routing do not settle the question.
In an equipment-side installation, the filter normally sits between the return duct and the blower. Air enters from the return side, crosses the filter, and then reaches the blower. At a return grille, room air crosses the filter first and then travels through the return duct toward the equipment.
Do not identify the blower by opening an internal compartment or reaching around wiring. If the direction cannot be established from routine-access markings, the manual, or externally visible ductwork, stop and obtain qualified help.
Do not open or operate the cabinet to “test” the direction
Do not run the system with the filter removed or with an equipment access panel open merely to observe suction. Filter guidance recommends turning the system off before removal, closing the accessible cover after installation, and consulting a technician when access would involve wiring or multiple equipment panels (safe filter-access guidance).
Stop and request qualified help if identifying the airflow path would require:
- Removing internal equipment panels
- Reaching around wiring
- Defeating an access-panel switch or interlock
- Entering an unsafe attic, crawl space, or other difficult area
- Handling a damaged filter cabinet
- Approaching wet or visibly damaged electrical equipment
A filter slot may sit close to a service panel without being part of it. Open only the grille, slot cover, or panel that the manufacturer identifies for routine filter access.
Which Way the Arrow Faces in Common Installations
The table below translates “toward the blower” into common physical orientations. These are examples, not universal rules. Printed airflow markings and equipment-specific instructions take priority.
| Filter location | Incoming-air side | Blower side | Normal arrow direction |
|---|---|---|---|
| Wall return grille | Occupied room | Wall cavity or return duct | Away from the room and into the wall |
| Ceiling return grille | Room below | Ceiling return duct | Away from the room and into the ceiling |
| Floor return grille | Room above | Duct below the floor | Downward into the duct |
| Return-duct slot beside equipment | Return duct | Furnace or air-handler side | From the return duct toward the blower |
| Dedicated media cabinet | Return inlet | Downstream side leading to the air handler or blower | Toward the blower or air handler |
| Upflow equipment | Return side, often below the blower | Blower side above | Often upward |
| Downflow equipment | Return side, often above the blower | Blower side below | Often downward |
| Horizontal equipment | Return end | Blower end | Sideways toward the blower |
Wall, ceiling, and floor returns
For a filter behind a wall return grille, the arrow normally points away from the occupied room and into the wall duct.
For a ceiling return, the arrow normally points away from the room and into the ceiling. Viewed from below, that may look like an upward-pointing arrow.
For a floor return, the arrow normally points downward into the duct beneath the floor.
In all three examples, the room is the incoming-air side. The duct behind the filter is the downstream side leading toward the blower.
Equipment-side racks and cabinets
At a rack beside a furnace or air handler, identify the return duct entering the equipment. Insert the filter so its arrow points from that return duct toward the blower or air-handler side.
If the return duct is on the left, the arrow may point right. If the return enters from the right, the arrow may point left. A vertically positioned filter can still have a horizontal airflow arrow. The slot’s physical orientation does not determine airflow.
Upflow, downflow, and horizontal systems
An upflow furnace moves system air generally upward through the equipment, so its filter arrow often points up. A downflow furnace reverses that physical relationship, so its arrow often points down. A horizontal air handler may require an arrow pointing sideways. These configuration-dependent examples all retain the same controlling rule: the arrow follows airflow toward the blower (upflow, downflow, and horizontal examples).
Do not identify the configuration solely from whether the equipment is in a basement, attic, closet, or crawl space. Location may suggest a common arrangement, but it does not establish the actual airflow path.
Ignore cosmetic orientation—but read every functional marking
The filter’s brand name may appear upside down after correct installation. That does not make the filter backward. Pleat appearance is not a dependable substitute for the airflow arrow.
Also distinguish between two different markings:
- AIR FLOW → identifies the direction air should pass through the media.
- THIS SIDE UP identifies a required physical position for a product that has one.
These labels are not interchangeable. Follow both when both are present. If they appear to conflict, stop and consult the product instructions instead of choosing one based on appearance.
A Safe, Repeatable Filter-Replacement Checklist
Use this procedure only for a filter that the equipment manufacturer intends homeowners to access routinely. Do not open internal furnace or air-handler service compartments.
-
Turn the HVAC system off. Use the thermostat or an ordinary system switch only if it is dry, visible, and safely accessible. Wait for the blower to stop before opening the filter grille or slot cover. Turning the equipment off before filter removal is part of standard replacement guidance (installation procedure).
-
Photograph the existing installation. Before removing the filter, record: - The printed size - The stated thickness - The airflow arrow - The filter’s position in the rack - Any arrow or direction label on the cabinet
The photograph is a reference, not proof that the old installation was correct. A previous installer may have reversed the filter.
-
Check the required specification. Compare the old filter with the rack label, cabinet label, and equipment documentation. Confirm the length, width, thickness, and product type. Do not assume that whatever happens to be in the slot is the specified filter.
-
Remove the old filter carefully. Slide it out without crushing it or shaking debris into the return opening. If it catches, look for a retaining clip or routine-access cover rather than pulling harder.
-
Confirm the airflow path. Identify the incoming return side and the downstream blower or air-handler side. If that cannot be done without internal access, stop.
-
Insert the replacement toward the blower. Align the printed AIR FLOW arrow so it points from the return side toward the blower or air handler.
-
Seat the filter fully. The filter should sit straight and snugly in its intended guides. Do not crush, fold, bow, trim, or force it. Check for obvious perimeter openings that would allow air to pass around the media.
-
Close and secure the access point. Reinstall the return grille, slot cover, or routine-access panel. Secure any latches or fasteners intended for homeowner operation.
-
Restore normal operation. Restart the system and observe it from outside the equipment. Confirm that the filter remains seated, the cover stays secure, supply airflow appears normal, and no new unusual sound is present.
-
Record the installation date and verified direction. Write the date on the filter frame if the product permits it. You may also mark the confirmed airflow direction beside an accessible slot, provided the mark does not obscure a warning, model number, equipment label, or existing instruction.
Do not use excessive force to compensate for a poor fit. A filter that will not slide into the specified rack may have the wrong actual dimensions, the wrong thickness, or an incompatible construction.
What to Do When the Arrow Is Missing or the Markings Conflict
A missing arrow calls for a hierarchy of evidence, not a visual guess.
Use this order:
- Filter-manufacturer instructions
- Filter cabinet or rack labels
- Equipment manual for the exact model
- A return-to-blower path clearly visible from outside the cabinet
- Confirmation from a qualified HVAC professional
Not every basic, reusable, proprietary, or specialized filter has a readable arrow. The marking may also be faded, damaged, hidden by the rack, or printed on an edge that is difficult to see. Turn the system off before removal, then inspect every edge under adequate lighting.
Do not rely on a universal mesh-side rule
Some publishers, including United Filter and One Hour Heating & Air Conditioning, describe wire mesh or reinforcement as downstream support that faces the blower. Other supplied filter guidance gives conflicting descriptions of which side should face downstream. Because filter construction varies, the evidence does not establish a universal mesh-side rule (discussion of directional reinforcement).
None of these features is a dependable universal direction indicator:
- Wire mesh
- Cardboard reinforcement
- Apparent media density
- Pleat shape
- A “fuzzy” or “smooth” side
- Label position
- Brand-name orientation
Reinforcement can help explain why a particular filter is directional, but it should not replace that product’s instructions.
If the original filter is available, record its manufacturer, model number, product number, and size. Use those identifiers to obtain the installation sheet or contact the manufacturer. That is more reliable than deciding that one side looks as though it should face the blower.
Specialized filters need specialized instructions
Follow the product and equipment documentation. Do not wash a filter unless it is explicitly identified as washable, and do not improvise the orientation of an electronic or proprietary filtration product.
Obtain qualified confirmation when:
- Product and cabinet arrows disagree
- A filter has no markings and its instructions cannot be found
- The filter location is inaccessible
- The duct path disappears into an enclosed chase
- Identifying the blower would require removing internal panels
- The existing rack or cabinet appears modified or damaged
If You Find the Filter Installed Backward
Correct a backward filter when you discover it. A brief reversal should not automatically be treated as an immediate equipment emergency, but that reassurance is general rather than system-specific. Filter condition, runtime, construction, and manufacturer guidance all matter (backward-filter guidance).
Filters are designed for airflow in a specified direction. Their media, frame construction, and downstream support may be arranged for that direction, so correct orientation remains important.
Flip it or replace it?
Consider replacing the filter rather than flipping it when it is:
- Heavily loaded with dust or debris
- Damp or water-stained
- Torn, crushed, or bowed
- Separating from its frame
- Pulling apart or shedding material
- Deformed enough that it no longer seals against the rack
- Known to have operated backward for an extended period
There is no reliable universal time threshold separating “safe to flip” from “must replace.” Filter type, condition, system runtime, and manufacturer instructions all affect the decision.
If the filter is clean, dry, intact, recently installed, and its manufacturer permits continued use, turning the system off and reinstalling it in the correct direction may be reasonable.
Do not use the dust pattern alone to infer airflow. Use the printed arrow and verified system path instead.
After correcting the direction, secure the accessible cover and observe operation from outside the equipment. Request service if unusual noise, persistently weak supply airflow, repeated shutdowns, or another abnormal condition remains. Such symptoms indicate that something still needs attention; they do not prove that the reversed filter caused a particular failure.
Direction Is Only Half the Job: Size, Thickness, and Filter Count
A correctly pointed arrow cannot compensate for a filter that is the wrong size, wrong thickness, poorly seated, or unsupported by the system.
Match the cabinet specification
The replacement must match the dimensions and thickness specified for the rack, cabinet, or equipment. Check:
- Width
- Length
- Thickness
- Product type
- Any cabinet-specific model requirement
Filter packaging often uses nominal dimensions, which may differ from exact physical dimensions. For example, a filter labeled 16 × 25 × 1 may measure approximately 15.5 × 24.5 × 0.75 inches (nominal and actual dimension example).
Do not round a tape measurement and assume the resulting nominal label will fit. Do not assume that every product with the same nominal dimensions has identical actual dimensions. Product construction and cabinet tolerances can differ.
One that is too small may leave edge gaps through which some return air can bypass the media.
The correct fit is snug, straight, and fully seated—not wedged into place.
Make sure you have found every intended filter
Some homes use one central filter at the furnace or air handler. Others use filters behind multiple return grilles. Inspect accessible return grilles and read equipment labels rather than assuming there is only one filter.
Whether multiple filter stages are appropriate depends on the system design.
Keep direction separate from filter resistance
Arrow direction and filter suitability are different questions:
- Direction: Does the arrow point toward the blower?
- Fit: Does the filter match the rack and seat without obvious gaps?
- Compatibility: Does the system support that product type, thickness, and resistance?
A filter can be pointed correctly and still be unsuitable. Do not assume that a higher MERV rating is automatically better for every system. Use a filter type and rating permitted by the equipment manufacturer or recommended for the specific installation.
There is also no universal replacement interval for every home. Follow the filter and equipment manufacturers’ instructions, then adjust inspection according to runtime, household dust, construction activity, pets, and other operating conditions. Replace the filter based on its applicable instructions and condition rather than an arbitrary calendar rule.
When the New Filter Is In but Something Still Seems Wrong
If airflow appears weaker or the system sounds different immediately after replacement, do not assume the arrow is backward. Perform a controlled external recheck:
- Turn the HVAC system off.
- Wait for the blower to stop.
- Verify that the AIR FLOW arrow points toward the blower or air handler.
- Confirm the specified width, length, and thickness.
- Check that the filter is fully seated and not crushed, bowed, or folded.
- Look for obvious edge gaps.
- Make sure the grille, slot cover, or routine-access panel is fully closed.
- Restore operation and observe airflow and sound from outside the equipment.
Possible installation-related explanations include:
- The wrong filter thickness
- A filter type with more resistance than the system supports
- A filter that is not fully seated in its guides
- A filter bent enough to obstruct the opening
- Obvious gaps that permit bypass
- A slot cover or routine-access panel that is not secured
- A replacement whose actual dimensions differ from the previous filter
These are possibilities, not diagnoses. Reduced airflow after a filter change does not prove incorrect direction, and an unusual sound does not identify a failed component.
HVAC Lens’s separate safety guide sets a conservative stop boundary for external homeowner checks: smoke, a burning odor, severe noise, repeated breaker tripping, visible ice, substantial leakage, damaged wiring, cabinet damage, or rapid repeated cycling are reasons to stop troubleshooting rather than repeatedly restart the equipment (safe external-check boundaries).
Do not test voltage, inspect the blower internally, bypass an interlock, or run the system with the filter or equipment access panel removed. Request qualified HVAC service when:
- The correct direction remains unclear
- The specified filter will not fit
- Cabinet and filter markings conflict
- Safe access is not possible
- Abnormal airflow, noise, odor, cycling, or leakage persists
Frequently Asked Questions
Does the furnace-filter arrow always point up?
No. The arrow follows airflow toward the blower, not gravity. It may point upward in an upflow system, downward in a downflow system, or sideways in a horizontal installation. At a remote return grille, it may point into a wall, ceiling, or floor duct.
Which way should the arrow point on a wall, ceiling, or floor return filter?
At a wall return, the arrow normally points away from the room and into the wall. At a ceiling return, it normally points away from the room and into the ceiling duct. At a floor return, it normally points downward into the duct.
In every case, verify that the indicated direction follows the return-air path toward the blower.
Does the wire or reinforced side of an unmarked filter face the furnace?
It may for some products, but that is not a universal rule. Published generic guidance conflicts, and filter construction varies.
Follow the filter manufacturer’s instructions, cabinet label, and equipment manual. If the product cannot be identified, obtain qualified confirmation rather than orienting it solely by wire mesh, pleat shape, reinforcement, or media texture.
Can I run the furnace briefly without the filter or access panel to find the airflow direction?
No. Do not operate the system with the filter or equipment access panel removed as an airflow test.
Use existing arrows, cabinet labels, the equipment manual, and externally visible duct routing. If those do not resolve the direction, request qualified help rather than opening the equipment or approaching internal components.
Will a furnace be damaged immediately if the filter was installed backward?
A brief backward installation should not automatically be portrayed as immediate equipment damage. Correct the direction when discovered and assess the filter’s condition.
Replace it if it is dirty, damp, damaged, deformed, pulling apart, or known to have run backward for an extended period. If abnormal operation continues after correct installation, arrange service rather than assuming the filter was the only issue.
The Bottom Line
The controlling rule for furnace filters’ direction of airflow is simple: follow the return air and point the filter arrow toward the blower or air handler, whether that direction is up, down, or sideways.
Before finishing, make this five-item check:
- System off during replacement
- Arrow pointing toward the blower
- Specified size and thickness
- Snug, unforced fit
- Secure grille, slot cover, or routine-access panel
If markings conflict, access is unsafe, or abnormal operation persists after correct installation, consult the equipment documentation or request qualified HVAC help rather than guessing or opening the system.