
Airflow
Point the Filter Arrow the Right Way in Any HVAC Setup
Point the printed arrow toward the blower, not the room or return-air source. It may physically point up, down, left or right depending on the installation.
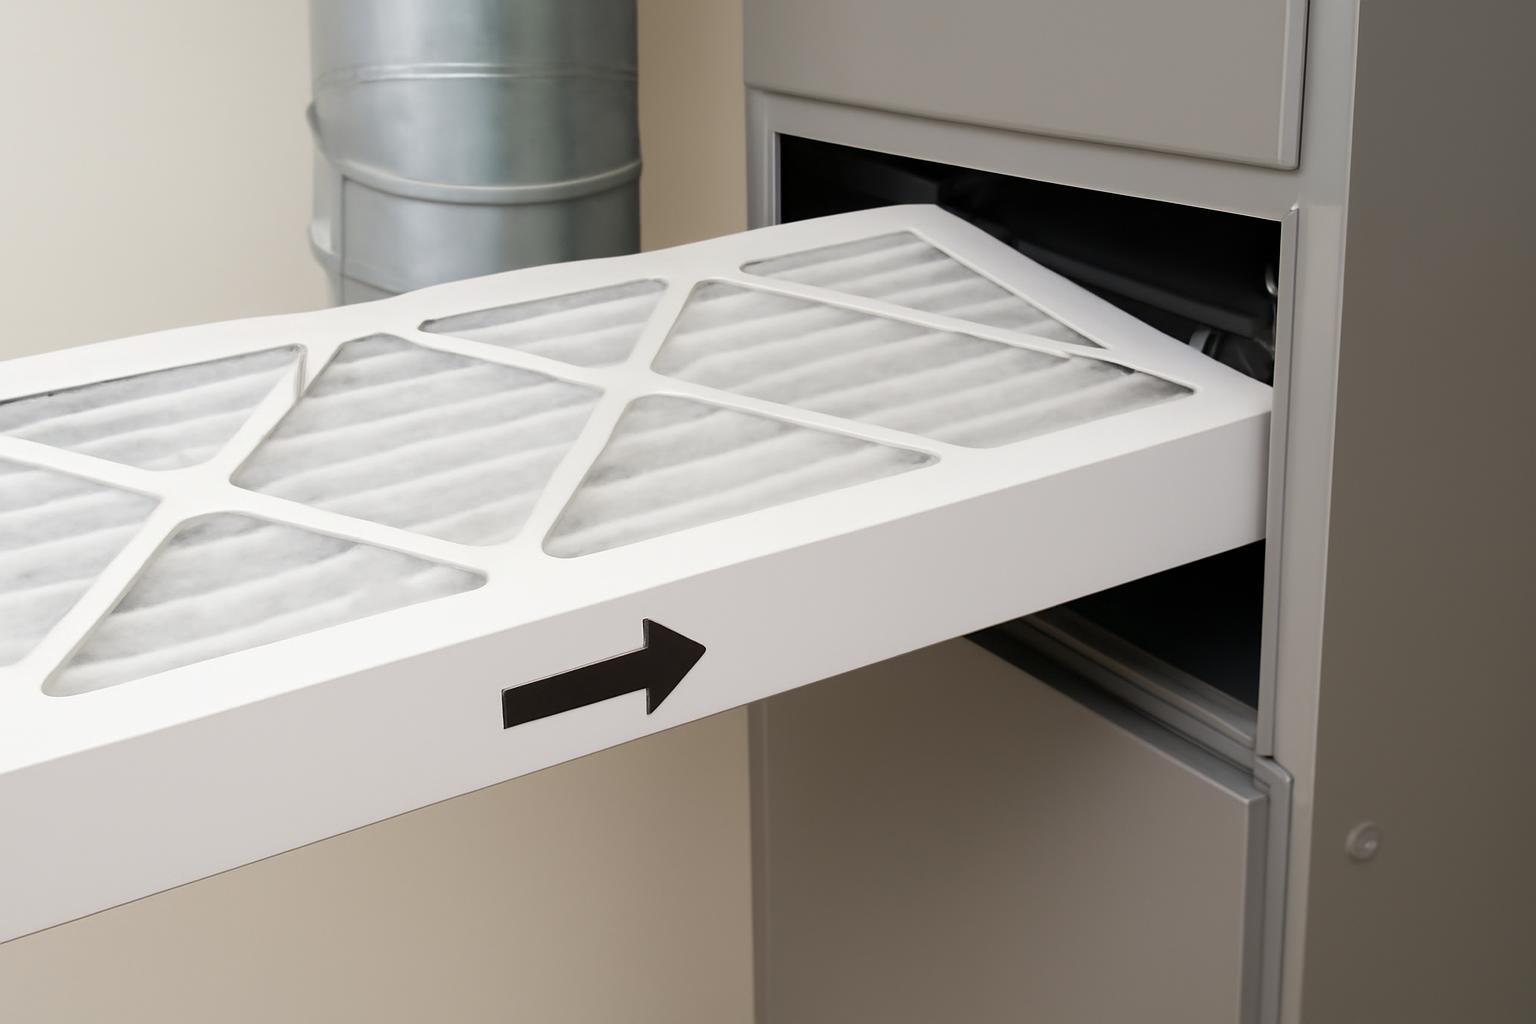
The quick answer: point the arrow toward the blower
Point the furnace filter’s printed airflow arrow toward the furnace, air handler, or blower—not toward the room or return-air source. The arrow follows the direction in which air moves through the filter.
The basic airflow path is:
Room or return duct → filter → blower or HVAC equipment → supply ducts → rooms
The filter normally sits upstream of the blower so it can capture particles before the air reaches downstream HVAC components. Therefore, the arrow points away from the return-air source and toward the equipment, as explained in CW Suter’s filter-orientation guide.
The arrow does not show which edge should enter the slot first. These are separate concepts:
- Insertion direction: How you physically slide the filter into the rack
- Airflow direction: How return air passes through the filter toward the blower
- Filter orientation: Which face receives incoming air, as determined by the arrow
Use this memory rule:
Find where the return air is going, then point the arrow along that path toward the blower.
Do not replace that rule with “always up,” “always down,” or “always inward.” The correct arrow may point up, down, left, or right depending on the installation. Physical direction varies; the return-to-blower rule does not.
Find the filter and identify the return-air side
Before deciding which way the furnace filter goes, identify where it is installed and which side receives return air.
Common filter locations include:
- Behind a large wall return grille
- Behind a ceiling return grille
- Beneath a floor return grille
- In a rack between the return duct and the furnace or air handler
- In a media cabinet attached to the return side of the equipment
- Behind a designated filter-access panel
A return grille draws room air back toward the HVAC system. A supply register delivers heated or cooled air to a room. Return grilles are often larger, but size alone does not prove which type of grille you are looking at. The important question is whether air enters or leaves the duct there.
Start with visible documentation instead of inferring airflow from the equipment’s shape. Look for:
- The airflow arrow printed on the filter frame
- An arrow or airflow label on the rack
- Labels on the furnace or air handler
- A diagram on the normal filter-access cover
- The airflow diagram in the equipment manual
- Instructions for the exact filter model
The filter should be between the return-air source and the blower. You do not need to open an unfamiliar internal furnace compartment to locate the blower. If it is enclosed, the return duct, rack markings, and equipment diagram may provide enough information.
Some homes have more than one filtered return. For example, separate return grilles may each contain a filter, while other systems use one central cabinet near the air handler. Do not assume every large grille requires a filter, and do not add filters to unfiltered locations without confirming the intended design. Common locations and multiple-filter arrangements are described in this filter-location and arrow-direction guide.
Do not determine airflow solely from:
- Whether the duct is above or below the furnace
- Gravity
- The idea that hot air rises
- Whether the equipment is in an attic or basement
- The direction of the old filter
A forced-air system’s blower controls the airflow path. Similar-looking equipment can be configured for upflow, downflow, or horizontal operation.
If the filter is behind a normal return grille or in a clearly labeled external rack, orientation is usually straightforward. If the slot is inaccessible, the layout remains unclear, or identifying the path would require opening sealed or unfamiliar components, stop and consult the model documentation, equipment manufacturer, or a licensed HVAC professional. That boundary reflects HVAC Lens’s homeowner-first approach: use external observations to understand the system rather than opening sealed equipment.
Arrow direction by filter location and furnace configuration
The table gives typical physical directions. The controlling rule in the final column takes priority over the example.
| Filter location or configuration | Typical arrow direction | Controlling rule |
|---|---|---|
| Wall return grille | Away from the room and into the wall | Follow return air into the duct |
| Ceiling return grille | Into the ceiling duct, often upward | Follow return air into the duct |
| Floor return grille | Downward into the floor duct | Follow return air into the duct |
| Upflow furnace | Often upward | Point toward the blower; verify equipment airflow |
| Downflow furnace | Often downward | Point toward the blower; do not rely on gravity |
| Horizontal unit | Sideways, either left or right | Point toward the blower end |
| Filter beside a furnace | From the return duct toward the equipment | Trace the return-to-blower path |
| Filter cabinet near an air handler | Into the air handler | Follow cabinet and equipment labels |
These are typical examples, not substitutes for the printed arrow, rack label, or equipment manual. Configuration guidance for wall, ceiling, floor, upflow, downflow, and horizontal arrangements follows the same underlying principle: the arrow tracks airflow toward the blower, as summarized in Filterbuy’s orientation guide.
Wall return grille
If the filter sits behind a large wall grille, room air enters through the grille and passes into the wall duct. The arrow therefore generally points away from the room and into the wall.
“Toward the furnace” does not mean the arrow must physically point toward the room containing the furnace. The duct may turn several times. At the filter, the arrow follows air into the duct.
Ceiling return grille
At a ceiling return, the arrow generally points into the ceiling duct. From the room, that commonly appears to be an upward-pointing arrow.
This does not create a universal “arrow up” rule. Upward is correct only because the return air enters the ceiling at that location.
Floor return grille
At a floor return, the arrow generally points downward into the duct. Air enters through the grille, passes through the filter, and continues toward the equipment.
The direction comes from the airflow path, not from gravity or the behavior of warm air.
Upflow furnace
In an upflow furnace, return air commonly enters near the bottom or side of the equipment and moves upward through the system. A filter serving this arrangement often has an arrow pointing upward.
The actual rack position still matters. Confirm the direction with the rack label or manufacturer’s diagram instead of assuming every filter near an upflow furnace must point vertically upward.
Downflow furnace
In a downflow configuration, the arrow often points downward toward the blower or along the equipment’s return-side path.
Follow the equipment markings. Do not reverse a documented downward arrow simply because another furnace used an upward-facing filter.
Horizontal furnace or air handler
A horizontal unit moves air sideways through the equipment. The filter arrow points horizontally toward the blower, but it may face either left or right depending on the installation.
“Horizontal” does not mean “arrow right.” Identify the return side and point the arrow toward the blower end.
Filter beside the furnace
A filter slot beside a furnace is usually positioned where the return duct meets the equipment. Trace the visible route:
Return duct → filter rack → furnace or air handler
If the return duct attaches on the left, the arrow may point right. If it attaches on the right, the arrow may point left.
How to install the filter safely and correctly
Use this checklist whenever you replace a furnace or HVAC filter.
-
Turn the HVAC system off at the thermostat. Shut the system off before removing the filter or opening its normal filter-access panel. Do not remove the filter or access cover while the blower is operating; filter-replacement instructions begin with shutting the system down before removal, as shown in this installation checklist.
-
Photograph the existing setup. Capture the old filter, its arrow, the rack, and nearby labels. The photograph can help with panel position and filter size, but it does not prove the old filter was installed correctly.
-
Record the required dimensions. Note the length, width, and thickness shown on the rack, filter cabinet, equipment instructions, or existing filter frame. If the sources disagree, use the equipment or rack specification.
-
Confirm the replacement type and size. The filter should slide into the intended rack without being crushed or forced. It should fit snugly enough that there are no obvious edge gaps through which air can bypass the media.
-
Find the printed airflow arrow. Check each edge of the frame. The marking may be small, faint, or printed beside the dimensions.
-
Confirm the return-to-blower path. Identify the side receiving room or return-duct air and the side leading toward the furnace, air handler, or blower. Use rack arrows, equipment labels, and the manual to verify the path.
-
Point the arrow toward the blower. Insert the filter so the arrow follows airflow from the return side toward the equipment. Focus on which filter face receives incoming air, not which edge enters the slot first.
-
Seat the filter in its rack. Make sure it rests in the intended tracks or supports. It should not be folded, crushed, tilted out of position, or left with an obvious path around its edges.
-
Close the grille or normal access panel completely. Reinstall the latches, clips, or fasteners used by the designated filter-access cover.
-
Restore normal operation. Turn the system back on at the thermostat and observe it externally. This is only a check that the filter stays seated and the cover remains closed—not a diagnosis of the system. If new or persistent whistling, rattling, weak airflow, or cycling problems appear, review the equipment instructions or seek professional assessment.
-
Label the confirmed direction. Once the airflow path is certain, mark a simple arrow near the slot without covering equipment labels. Record the required filter size and replacement date as well.
For a washable or reusable filter, follow the filter manufacturer’s cleaning and orientation instructions. Allow it to dry completely before reinstalling it, and preserve any specified front, back, top, or airflow direction.
Do not routinely operate the HVAC system without its intended filter. If the replacement is damaged, unavailable, or incorrect, obtain the specified filter rather than treating filterless operation as a maintenance solution. Contractor guidance likewise advises keeping the intended filter in the airflow path rather than running without one, as explained in Arpi’s overview of filter arrows.
What to do when the filter has no arrow or the markings conflict
An unmarked filter calls for model-specific documentation, not a visual guess. Work through these steps in order.
1. Check every edge again
With the system off, remove the filter and inspect all four edges in good light. Look near:
- The dimensions
- The model number
- Performance markings
- Bar codes or manufacturing text
- Frame seams
- Repeated brand markings
An airflow arrow may be faint or hidden on an edge that was inside the rack.
2. Inspect the packaging
Look for an installation diagram, incoming-air label, equipment-side label, or airflow arrow. Keep the packaging until you have confirmed that the filter is compatible with the rack.
3. Search the exact filter model number
Use the filter manufacturer’s official instructions for that specific model.
4. Contact the filter manufacturer if necessary
If the instructions remain incomplete, provide the manufacturer with:
- The exact model number
- The filter dimensions
- Photographs of both faces
- A photograph or description of the rack
- The furnace or air-handler model number, if available
Ask which face receives return air and which face points toward the blower.
5. Check the rack and equipment documentation
Look for an airflow label on the filter rack or cabinet. Then check the furnace or air-handler manual using the exact equipment model number. The manual may identify the return opening, blower location, intended filter arrangement, and required dimensions.
6. Align the documented filter direction with the system
Once the filter’s required orientation is known, align it with this path:
Return-air side → filter → blower side
Do not simply copy the removed filter. A previous homeowner, tenant, or maintenance worker may have installed it backward.
Generic visual advice is unreliable because filter construction varies. Supplied guides disagree about whether wire mesh, reinforcement, the denser-looking face, or the more open-looking face should point toward the blower. Those construction cues should remain secondary to the printed arrow and model-specific instructions.
Pleat appearance is also not a universal orientation method. The shape or density of the pleats may help a manufacturer describe one product, but it does not override an airflow arrow or installation diagram.
If the filter arrow conflicts with the rack label or equipment manual, stop rather than choosing one at random. Confirm that you have the correct filter model and the correct equipment documentation, then contact the filter manufacturer, equipment manufacturer, or a licensed HVAC professional.
Do not run the system with the filter removed or an equipment-access panel open to test airflow. That bypasses the intended filter and may require opening a compartment outside a routine homeowner filter change. Use external labels and documentation instead.
What may happen if a furnace filter is backward
A furnace may continue to run when a directional filter is installed backward. Continued operation does not prove the orientation is correct.
Directional filters are constructed to work with airflow moving in a specified direction. Depending on the filter and system, reversing one may:
- Reduce its intended filtration performance
- Add airflow resistance
- Cause the filter media to bow or deform
- Put reinforcement on the wrong side for the designed airflow
- Make the filter less stable in its rack
Some filters are reinforced for pressure in a particular direction, which is why the printed arrow matters, according to this HVAC service provider’s explanation of filter construction.
If you discover a backward filter:
- Turn the system off.
- Confirm the return-to-blower path.
- Remove the filter.
- Inspect it for tears, bowing, deformation, or heavy dirt.
- Reinstall it with the arrow toward the blower, or replace it if it is damaged or due for replacement.
- Close the normal filter-access cover.
- Restore operation and observe the system externally.
Avoid worst-case assumptions. One reversed filter does not inevitably cause equipment failure, major repairs, fire, or mold. Nor is there enough evidence to promise a specific energy saving after correcting it. The result depends on the filter’s construction and condition, the rack, the system airflow, and how long the filter was reversed.
Orientation is only one part of the airflow picture. A correctly oriented filter can still be restrictive or ineffective if it is:
- Heavily loaded with dust
- The wrong size
- Crushed or damaged
- Incompatible with the equipment
- Outside the rack tracks
Correcting the arrow may not resolve weak airflow, noise, short cycling, or uneven comfort if another restriction or equipment problem is present. Do not remove the filter and continue operating the system as a workaround.
Checks after installation and when to call for help
After installation, make one final external inspection.
Confirm that:
- The arrow points toward the furnace, air handler, or blower
- The filter matches the required length, width, and thickness
- The filter is seated in the intended tracks
- The frame is not visibly crushed or deformed
- There is no obvious open path around the filter
- The grille or filter-access panel is fully closed
- Any normal latch, clip, or retaining wire is back in position
An obvious gap may indicate a size mismatch, but there is no universal gap tolerance for every rack. Some filters are sold by nominal size, and different cabinets support them differently. If a filter seems unusually loose, compare the equipment specification and the replacement filter’s actual dimensions rather than packing material around it.
After restarting the system, observe it without opening panels. Persistent weak airflow, whistling, rattling, short cycling, or uneven comfort is not automatically a filter-direction problem. If broader operating symptoms continue, use a structured guide such as HVAC Lens’s furnace troubleshooting overview to organize external checks and determine when professional service is appropriate.
Check the filter’s condition and follow the filter and equipment manufacturers’ replacement guidance rather than using one interval for every home. Service life can vary with:
- Filter depth and construction
- HVAC runtime
- Household dust
- Pets
- Smoking or other particle sources
- Renovation or construction activity
- Equipment airflow requirements
- Year-round system operation
Recording the installation date helps you see how quickly the filter loads under your household’s normal conditions.
Call the equipment manufacturer or a licensed HVAC professional when:
- The airflow path remains unclear
- The filter slot is inaccessible
- The rack and filter arrows conflict
- The equipment configuration is unusual
- The filter will not fit despite matching the listed nominal size
- The correct filter type cannot be confirmed
- The system has multiple possible filter locations
- Airflow remains restricted after the correct filter is installed
- Determining the direction would require internal furnace work
- A panel is sealed, wired, or not intended for routine filter access
Stay within external homeowner checks. Do not open sealed components or perform internal furnace work. HVAC Lens provides general information rather than contractor advice, and its terms explain that equipment varies by home and installation.
Useful questions for a contractor include:
- Where is the return-air side of this system?
- Which compartment contains the blower?
- What filter dimensions and type does this equipment specify?
- Are all intended filter locations accounted for?
- Is this filter rack intended for this equipment?
- Should this system be filtered at the return grille, the air handler, or another designated location?
- Could there be an unintended filter elsewhere in the same airflow path?
These questions help distinguish an orientation problem from a size, compatibility, rack, or system-airflow issue.
Frequently asked questions
Should the furnace-filter arrow point toward or away from the furnace?
The arrow should point toward the furnace, air handler, or blower and away from the room or return-air source.
The airflow path is:
Return air → filter → blower or HVAC equipment
At a return grille, this usually means the arrow points into the duct. At a rack beside the furnace, it points from the return duct toward the equipment. It indicates airflow direction, not which edge should enter the slot first.
Which way does a furnace filter go if there is no arrow?
Do not rely immediately on mesh, pleat shape, or whichever side looks more porous. Instead:
- Check every edge for a faint arrow.
- Inspect the packaging.
- Find the exact filter model number.
- Read the manufacturer’s instructions.
- Check the rack label.
- Consult the furnace or air-handler manual.
- Align the documented filter orientation with the return-to-blower path.
If those sources do not resolve the direction, contact the filter manufacturer, equipment manufacturer, or a licensed HVAC professional. Do not run the system with the filter or an equipment panel removed to test airflow.
Does the wire or reinforced side of a furnace filter face the blower?
Not as a universal rule. Filter designs vary, and generic guidance about wire mesh or reinforcement is inconsistent.
Use the printed airflow arrow or instructions for the exact filter model. If there is no arrow, consult the packaging and manufacturer before treating wire position as a secondary clue. Product-specific documentation takes priority over appearance.
Can I install the new filter in the same direction as the old one?
Use the old filter as a reference, but verify it before copying it. The previous filter may already have been backward or may not have been the correct size.
Photograph the existing setup, then independently confirm that the arrow points from the return-air side toward the furnace, air handler, or blower. Confirm the required dimensions from the rack or equipment instructions as well.
Once the direction is verified, label the slot with an airflow arrow and record the required size.
What should I do if I have been running the furnace filter backward?
Turn the system off, confirm the return-to-blower path, and reinstall the filter with its arrow toward the blower. Replace it if it is torn, deformed, heavily loaded, or no longer fits properly. Close the normal filter-access cover before restoring operation.
Do not assume major equipment damage has occurred solely because the filter was reversed. If weak airflow, unusual noise, short cycling, or comfort problems continue after correction, arrange professional evaluation rather than operating without a filter.
The rule to remember
Follow return air through the filter toward the furnace, air handler, or blower. Verify the arrow, specified size, fit, and panel closure, then label the confirmed direction for next time.
If the markings conflict or the equipment layout remains unclear, stop and use model-specific instructions or professional help rather than guessing or opening unfamiliar compartments.