
Airflow
Find Where the Dampness Starts Before You Pay to Treat It
A dehumidifier removes airborne moisture, but cannot reasonably compensate for an active leak, repeated flooding or groundwater entering the space.
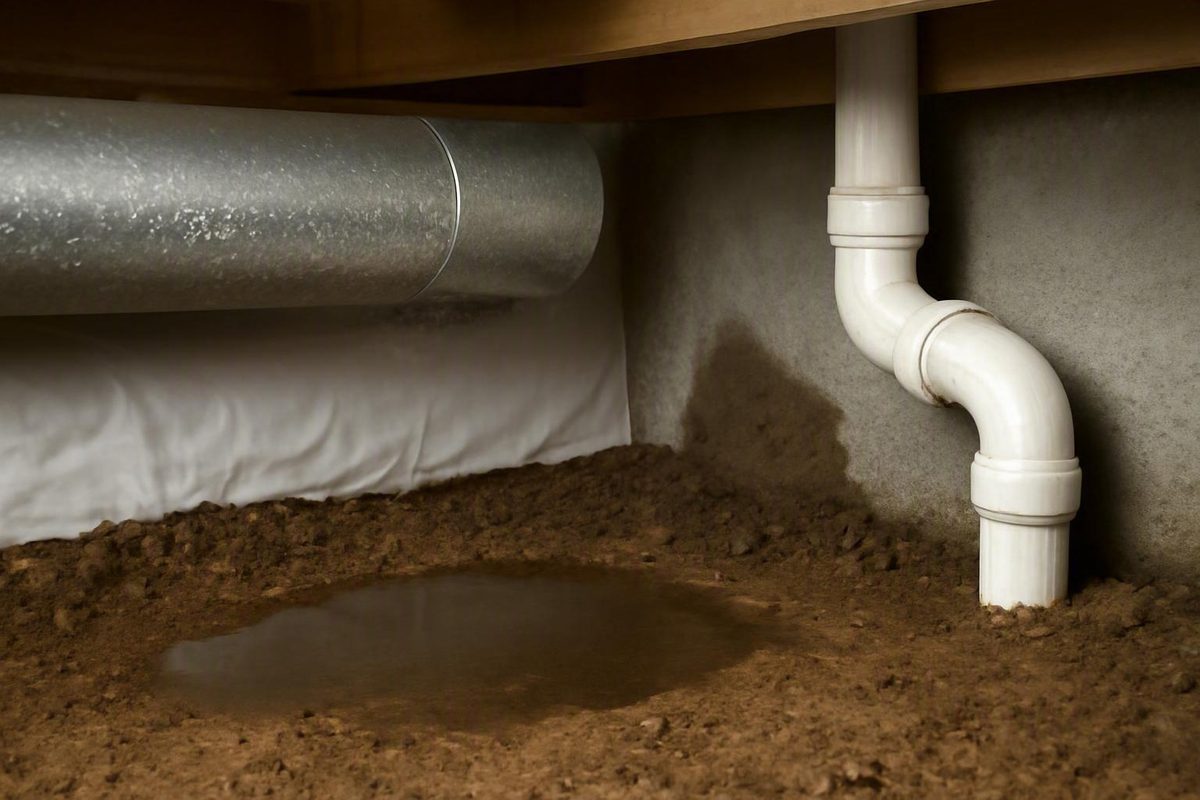
Crawl space moisture is a symptom, not a diagnosis. A puddle after rain, droplets on a cold duct, damp exposed soil, and a wet spot beneath a plumbing joint may look similar, but they call for different repairs.
Use this sequence:
- Determine whether you have active water, condensation, soil vapor, or persistently humid air.
- Make the area safe and stop plumbing or equipment leaks.
- Control roof runoff, surface drainage, and groundwater where necessary.
- Reduce evaporation from exposed soil.
- Decide how ventilation, air sealing, insulation, and HVAC conditions should be handled.
- Use dehumidification for the airborne moisture that remains.
- Verify the result through repeat measurements and inspections.
That order helps prevent a common mistake: buying equipment or an encapsulation package before establishing where the dampness starts.
Start Here: Is This Humidity, Condensation or Active Water?
Begin with a flashlight inspection from a safe access point. Do not assume every wet surface is caused by high humidity—or that every puddle entered through the foundation.
Sort what you see into four categories:
- Standing or flowing water: Puddles, streams, active dripping, saturated low spots, or water entering at a wall or footing.
- Condensation: Droplets or a thin film on cool pipes, ducts, foundation surfaces, framing, or the underside of the floor.
- Damp soil or materials: Dark soil without a visible pool, wet insulation, stained wood, or a damp liner.
- Elevated airborne humidity: A clammy space, persistent musty odor, or high instrument readings without an obvious liquid-water source.
Standing or moving water takes priority. A dehumidifier removes water vapor from air; it cannot reasonably compensate for an active plumbing leak, repeated flooding, or groundwater that continues entering the space.
Warning signs to document
Look for:
- Pooled or moving water
- Drips from plumbing, ducts, framing, or floor assemblies
- Droplets on cold-water pipes or air-conditioning ducts
- Damp, sagging, or fallen insulation
- Musty or earthy odors
- Visible spotting, films, or growth
- Dark stains or tide marks on foundation walls and supports
- Softened, crushed, split, displaced, or visibly deteriorated framing
- Rust or corrosion around equipment and fasteners
- Floors above that have become cupped, buckled, warped, soft, or unusually squeaky
These are clues, not complete diagnoses.
Localized water versus widespread droplets
Location and pattern can narrow the possibilities.
Water concentrated below a supply fitting, drain connection, or visible pipe crack suggests a possible plumbing leak. Observe the joint while the relevant fixture operates, but do not dismantle plumbing in an unsafe or inaccessible space.
Droplets spread across several cool pipes, ducts, walls, or framing members during humid weather are more consistent with condensation. Condensation becomes possible when a surface is colder than the dew point of the surrounding air.
A pipe can leak and condense at the same time. Follow the water to its highest or most concentrated point instead of relying on one wet spot.
Record:
- Where the moisture first appears
- Whether it is localized or widespread
- Whether it follows rain
- Whether a pipe is actively dripping
- Which fixtures or appliances were operating
- Whether the air conditioner was running
- Whether the condition changes by season
- Whether vents were open or closed
- Whether water rises from a low point or enters at a wall
Photographs taken from the same position before and after rain are often more useful than memory.
Urgent escalation
Do not enter a crawl space containing sewage or other potentially contaminated water, water near exposed electrical components, persistent flooding, or access too low or unstable for safe movement. Crawl spaces may also present poor lighting, pests, sharp debris, restricted access, and limited electrical service; restoration guidance identifies access and electrical constraints as significant drying-work hazards (Reets Drying Academy).
Arrange qualified evaluation for extensive visible growth, severely softened or displaced framing, suspected structural movement, or any condition you cannot inspect safely. Do not enter water that may be electrically energized, disturb a large area of unknown growth, or judge structural capacity from appearance alone.
The Five Moisture Pathways to Investigate
More than one pathway may operate at once. A house can have poor downspout discharge during storms, exposed soil evaporating moisture afterward, and condensation on cold ducts during summer.
Finding one source does not prove that it is the only source.
1. Rain or groundwater intrusion
Bulk water can enter:
- Through foundation cracks or porous wall areas
- At joints between walls and footings
- Under or around footings
- Through utility openings
- Across low sections of the crawl-space floor
- From seasonally high groundwater
- From uphill runoff or saturated soil beside the foundation
Water appearing at one wall after rain should lead you outside before it leads you to a dehumidifier catalog. Examine the corresponding roof edge, gutter, downspout, grade, paved surface, window well, landscaping, foundation wall, and exterior low spots.
Water repeatedly emerging from the ground during prolonged wet weather may indicate a groundwater or high-water-table problem. The appropriate response depends on the foundation, elevations, soil, entry point, and available discharge options, so recurring groundwater generally calls for property-specific drainage evaluation.
2. Failed exterior drainage
Roof and surface drainage are separate from indoor humidity control. Common defects include:
- Gutters clogged with debris
- Gutters that overflow or pitch toward the wrong outlet
- Missing, disconnected, crushed, or leaking downspouts
- Downspouts ending beside the foundation
- Discharge aimed toward a crawl-space opening
- Soil or landscaping sloping toward the house
- Patios, walks, or driveways directing runoff inward
- Depressions holding water beside the foundation
Inspect during rainfall if you can do so safely. A clean-looking gutter may still overflow at a roof valley or leak at a joint. Follow the discharged water beyond the downspout: moving it a short distance does not help if it flows back toward the house.
A USDA Forest Products Laboratory review identifies grading, properly drained downspouts, and foundation drainage as first-line water-entry controls. It also identifies rain or groundwater, plumbing, soil evaporation, and ventilation air as distinct moisture sources (USDA Forest Service, “Moisture in Crawl Spaces”).
3. Plumbing leaks
Inspect beneath and around:
- Supply-pipe joints
- Drain and waste lines
- Fixture locations
- Hose connections
- Water heaters and other water-using equipment
- Pipe penetrations through the floor
- HVAC condensate piping
Clues include an active drip, wet fitting, mineral deposits, concentrated staining, a damp trail below one pipe, or water appearing when a fixture drains.
Condensation usually coats the outside of a cool pipe more broadly. Leakage is more likely to begin at a joint, fitting, crack, or penetration.
4. Evaporation from exposed soil
A dirt floor does not need a puddle to contribute moisture. Water held in the soil can evaporate into crawl-space air.
Possible signs include:
- Broadly damp or dark soil
- Humidity that remains elevated after rainwater disappears
- No obvious wall-entry point
- More moisture near uncovered soil than covered areas
- Condensation recurring after plumbing and drainage defects are corrected
A continuous vapor-resistant ground cover can substantially reduce this pathway. It cannot repair plumbing, stop water entering through a wall, or replace drainage needed for recurring bulk water.
5. Humid air condensing on cool surfaces
Warm, humid air can deposit water on surfaces colder than its dew point. Potential condensation surfaces include:
- Cold-water pipes
- Air-conditioning ducts
- Metal equipment cabinets
- Foundation walls
- Cooler soil or liners
- Floor framing
- The underside of an air-conditioned floor
This is why opening vents can sometimes make a crawl space wetter. If incoming outdoor air has a dew point above the temperature of crawl-space surfaces, admitting more of that air increases condensation risk.
Symptom-to-source guide
| What you observe | Timing or location | More likely pathways | What to inspect next |
|---|---|---|---|
| Puddle at one foundation wall | Appears after rain | Roof runoff, grading, wall or footing entry | Gutters, downspouts, slope, cracks, exterior low spots |
| Water rising in the lowest area | Prolonged wet weather | Groundwater or high water table | Floor elevation, existing drainage, site conditions |
| Wet area below one pipe joint | Continuous or tied to fixture use | Supply or drain leak | Joint, fitting, fixture operation, water trail |
| Droplets on several pipes or ducts | Humid weather or AC operation | Condensation | Air temperature, dew point, surface temperature |
| Uniform dampness over bare earth | Persistent or worse after rain | Soil evaporation | Ground-cover condition and bulk-water entry |
| Wet insulation under the floor | Localized or widespread | Leak, condensation, humid-air entry | Framing and services above and below insulation |
| Tide marks on a wall | Repeated at a similar height | Wall seepage or past flooding | Rain timing, exterior grade, cracks, drainage |
| Musty odor without visible water | Seasonal or persistent | Hidden damp material, soil vapor, condensation | Instrument readings, cavities, insulation, liner |
| Moisture near an open vent | Humid outdoor conditions | Outdoor-air entry and condensation | Outdoor dew point, surface temperature, airflow path |
| Broad moisture after one repair | Continues despite repair | Multiple pathways | Repeat the complete inspection |
Use the table to choose the next inspection step, not as proof of causation.
Measure Conditions Instead of Relying on a Single Damp-Day Impression
Touch and odor can show that something deserves attention, but they cannot establish whether conditions are improving or whether one humid afternoon was unusual.
Use a hygrometer or combined temperature-and-humidity sensor to track relative humidity and temperature.
Understand relative humidity and dew point
Relative humidity describes how close air is to saturation at its current temperature. Because the value changes with temperature, the same amount of water vapor can produce different relative-humidity readings as air warms or cools.
Dew point answers a different question: How cool can a surface become before condensation is possible?
If the air’s dew point is above the temperature of a duct, pipe, wall, or floor surface, condensation can form there. A crawl space may therefore develop droplets on an air-conditioning duct without a plumbing leak. Conversely, a high relative-humidity reading does not prove that every surface is condensing.
Why one reading can mislead
A reading may change because of:
- Temperature
- Recent rainfall
- Time of day
- Season
- An open access door
- Vent position
- Air-conditioning operation
- Dehumidifier cycling
- Sensor placement
- Temporary water removal or drying work
Take readings in consistent locations. A wet wall or low area may deserve its own sensor, but that reading should be identified as local rather than representative.
Useful comparison periods include:
- Before and after rain
- During several dry days
- During humid seasonal weather
- While air conditioning is operating
- Before and after drainage or vapor-control work
- After a heavy storm
- During the season when the problem was worst
Track wood moisture as a trend
A pin or pinless moisture meter can help compare framing at the same marked locations over time. Follow the meter manufacturer’s instructions.
Wood moisture around 19–20% is a practical warning level that warrants investigation, not proof of decay. Actual significance also depends on how long the wood remains wet, temperature, species, material condition, and measurement accuracy (USDA Forest Service crawl-space review).
Do not use one measurement to declare framing safe, decayed, or structurally compromised. Look for patterns:
- Are readings falling after water control?
- Does one joist remain wetter than adjacent members?
- Do readings rise after rain?
- Is wood near a duct wetter during cooling weather?
- Does one area remain elevated through dry weather?
Avoid one universal humidity target
Commercial recommendations do not all use the same relative-humidity target, and one value cannot guarantee that growth or deterioration will or will not occur.
Select a working setting with the system designer or qualified contractor, then evaluate whether:
- Condensation has stopped
- Wet materials continue drying
- Conditions remain controlled through weather changes
- Equipment can maintain the setting without unexplained continuous operation
Simple crawl-space observation log
| Date and time | Outdoor weather | Recent rain | Crawl-space temperature | Relative humidity | Visible water or condensation | Wood reading and location | Odor or material changes | Dehumidifier status |
|---|---|---|---|---|---|---|---|---|
| On/off, setting, runtime | ||||||||
| On/off, setting, runtime | ||||||||
| On/off, setting, runtime |
Add notes about vent position, HVAC operation, pump operation, or plumbing use when relevant. Consistent observations are more useful than one elaborate inspection.
Use the Right Repair Order: Water First, Humidity Last
Repair order matters. A liner can be undermined by flooding, new insulation can conceal wet framing, and a dehumidifier can run continuously while water keeps entering.
1. Make the area safe
Before entry or equipment setup, identify contaminated water, electrical exposure, unstable or damaged materials, pests, sharp debris, inadequate lighting, and restricted access. If safe inspection is not possible, stop and call the appropriate professional.
2. Stop plumbing and equipment leaks
Repair active supply, drain, condensate, or water-using-equipment leaks. Confirm the repair while the relevant fixture or system operates. A dry stain alone does not prove that a leak has stopped.
3. Remove standing water
Standing water must be removed using methods appropriate to its source and possible contamination. Removing the visible pool is only the first step: determine why it accumulated and ensure any proposed discharge location will not send it back toward the foundation.
4. Correct roof runoff and surface drainage
Repair overflowing gutters and damaged downspouts, then address soil or hardscape that directs water toward the house. These measures reduce the surface water reaching the foundation before an interior system must manage it.
5. Evaluate groundwater and foundation drainage
Recurring seepage or water rising through low areas may require a foundation drain, interior perimeter drain, French drain, sump pump, or another property-specific approach. These are all bulk-water tools, but they are not interchangeable.
Ask the evaluator to account for:
- Foundation construction and elevations
- The documented entry point
- Soil and groundwater behavior
- Whether gravity drainage is possible
- Available discharge options
- Applicable local requirements
- Whether exterior excavation is feasible
A proposal should explain how water reaches the drain or collection point and how discharge is kept from returning to the house. Detailed drainage design belongs with a qualified local evaluator.
6. Address unsafe wet materials and dry the structure
Structural drying focuses on wet building materials rather than trying to dry all the soil beneath the building.
Wet insulation may need removal so concealed framing can be inspected and dried, especially when the insulation is saturated, fallen, contaminated, or blocking access. There is no universal keep-or-replace rule: material type, contamination, duration of wetting, physical damage, access, and source correction all matter.
Do not cover unresolved wet framing with new fiberglass or spray foam. Commercial crawl-space guidance specifically cautions against adding those insulation materials in an already damp assembly because moisture may remain hidden or trapped (Basement Systems’ crawl-space repair cautions).
7. Suppress soil vapor
After bulk-water problems have been addressed, cover exposed earth with a continuous vapor-resistant ground cover. It should be durable enough for expected access and should limit exposed gaps at seams, penetrations, piers, columns, and perimeter transitions.
Treat exact material and attachment details as design and code questions, not universal specifications.
8. Air-seal where appropriate
Air sealing may reduce humid outdoor-air entry, but it must fit the crawl-space design, climate, HVAC arrangement, combustion safety, radon plan, inspection needs, and local requirements. Closing vents alone does not create a complete closed crawl space.
9. Add humidity control
A properly selected dehumidifier can manage residual airborne moisture after leaks, bulk water, soil evaporation, and uncontrolled humid-air entry have been reduced. It should not be used to conceal standing water or persistent foundation intrusion. Dehumidification removes moisture from air but does not stop water entering through leaks, drainage defects, exposed soil, or open air paths (Total Home Performance).
10. Verify results
Repeat inspections and measurements after rain, during humid weather, and through the season that previously caused the problem. Installation completion is not proof of performance.
Match Each Moisture-Control Tool to the Job It Can Do
No product controls every moisture pathway. A useful proposal identifies what each component addresses, what must happen first, and what would show that the measure is insufficient.
| Measure | Moisture pathway controlled | Prerequisites | Important limitations | Maintenance | Signs it is insufficient |
|---|---|---|---|---|---|
| Gutters, downspouts, grading | Roof runoff and surface water | Working roof drainage and suitable discharge route | Does not control plumbing, groundwater, soil vapor, or condensation | Clear debris; inspect joints, outlets, erosion, and slope | Overflow, foundation pooling, water after rain |
| Foundation or perimeter drainage | Wall, footing, or accumulated bulk water | Site-specific diagnosis and viable discharge | Design varies by foundation, soil, grade, and groundwater | Inspect accessible inlets and outlets | Recurring seepage or water bypassing the system |
| Sump pump | Water reaching a basin or collection system | Suitable basin, power, controls, and discharge plan | Does not prevent every entry pathway or control soil vapor | Test operation and inspect discharge | Overflow, failure, short cycling, returning water |
| Ground vapor barrier | Evaporation from exposed soil | Bulk water and sharp debris addressed | Does not repair leaks, wall seepage, flooding, or grading | Inspect tears, seams, edges, and penetrations | Exposed soil, shifted material, water above liner |
| Air sealing or vent closure | Humid-air leakage in a closed design | Safety and code review, ground cover, humidity plan | Can affect combustion, HVAC operation, radon planning, and access | Inspect seals, doors, and penetrations | Persistent air entry, condensation, equipment issues |
| Dehumidifier | Residual water vapor in air | Major liquid-water sources reduced; reliable power and drainage | Does not stop leaks or bulk water | Clean filters; inspect drain, frost, noise, and sensor | Continuous runtime, missed setting, icing, drain failure |
| Full encapsulation | Combined soil-vapor and air control, often with drainage and mechanical drying | Source diagnosis and compatible enclosure plan | More extensive than every home requires | Inspect liner, transitions, drains, pumps, filters, and equipment | Water above liner, loose details, trapped dampness |
Gutters, downspouts, and grading
These controls keep roof and surface water from reaching the foundation. Verify them during rain. Confirm that water reaches the intended outlet without entering a vent, eroding soil beside the house, or flowing back along the foundation.
Drains and sump pumps
Drains collect or redirect bulk water. A sump pump removes water reaching a basin. Neither explains why water is present, and neither automatically controls condensation or soil vapor.
Ask the designer:
- Where is water expected to enter?
- How will it reach the drain or basin?
- What happens during heavy rain or power loss?
- Where does the discharge terminate?
- How will the system be inspected and tested?
- What prevents discharged water from returning?
Ground vapor barriers
A useful ground cover has:
- Low water-vapor permeance, meaning it allows little water vapor to pass through
- Adequate durability for foot and knee traffic
- Continuous floor coverage
- Managed seams and penetrations
- Appropriate transitions at walls and supports
- Resistance to displacement during service access
Technical crawl-space literature commonly discusses 6-mil polyethylene, but that thickness is not a universal statement of current code or suitability. Durability, vapor permeance, continuity, site conditions, and current local requirements all matter.
A floor-only barrier may be reasonable when soil evaporation is the primary problem and recurring bulk water is absent.
Dehumidifiers
A crawl-space dehumidifier removes water vapor from air. Ask a qualified installer about:
- Capacity at expected temperatures and humidity
- Operating temperature range
- Air distribution through divided areas
- Suitable electrical supply
- Gravity drainage versus a condensate pump
- Discharge destination
- Filter access
- Drain-line inspection and cleaning
- Frost control
- Noise and vibration
- Sensor placement
- Expected runtime and service access
Continuous operation or failure to maintain the selected setting can indicate:
- Standing water or wall seepage
- Open vents or major air leakage
- Exposed soil
- A torn or poorly transitioned liner
- Blocked condensate drainage
- Dirty filters
- Frost or mechanical trouble
- Poor air distribution
- Inadequate capacity
- An unrepresentative sensor location
Commercial guidance for dehumidifiers used without complete encapsulation similarly notes that exposed soil and recurring outdoor-air moisture can produce long runtimes. It also recommends checking filters, drainage, frost, noise, and capacity (Argendon).
Treat poor performance as diagnostic evidence before assuming that a larger machine is the answer.
Encapsulation
Encapsulation is a coordinated system, not simply plastic laid on dirt. Depending on the property, it may include:
- Bulk-water management
- A sealed floor-and-wall vapor-control layer
- Managed seams, supports, and penetrations
- Perimeter air sealing
- Crawl-space door treatment
- Compatible insulation
- Conditioned air, direct dehumidification, or another approved humidity strategy
- Drainage and condensate discharge
- Inspection and maintenance access
Full encapsulation may be appropriate when several moisture pathways persist or when a deliberately closed crawl space is being created. It is not automatically necessary for every house. A limited soil-vapor problem may be manageable with a durable ground cover after leaks and drainage defects are corrected.
Separate essential source control from optional system upgrades. Repairing an active leak or recurring bulk-water problem is essential. A more comprehensive liner, monitoring package, or full encapsulation is a later decision based on the documented sources and intended crawl-space design.
Why Opening or Sealing Vents Is Not a Universal Answer
Crawl spaces can have materially different configurations:
- Open pier-and-beam: The perimeter is substantially open to outdoor airflow.
- Wall-vented: A continuous foundation wall includes exterior vents.
- Closed: The perimeter is intentionally separated from outdoor air.
One vent prescription cannot be applied safely and effectively to all three.
Vents do not guarantee effective drying
The presence of vents does not establish how much air moves through the crawl space. Airflow depends on:
- Wind speed and direction
- Vent placement
- Interior obstructions
- Foundation shape
- Nearby buildings and vegetation
- Openings between crawl-space sections
- Temperature and pressure differences
A vent may admit humid air without producing meaningful cross-flow through the dampest areas.
Outdoor air can add moisture
Ventilation helps only when incoming air can carry moisture away without causing condensation. If outdoor-air dew point is above the temperature of crawl-space surfaces, additional outdoor air can wet cool ducts, pipes, walls, framing, or an air-conditioned floor.
That is why “open in summer, close in winter” is not a reliable universal rule. Climate, current weather, surface temperature, and crawl-space design matter more than the calendar alone.
Practical advice conflicts
Published approaches differ:
- Some closed-crawl designs seal perimeter vents.
- Some staged systems retain an opening for active exhaust.
- Temporary restoration plans may use deliberate ventilation during drying.
- Direct dehumidification recirculates and dries crawl-space air.
- Conditioned-air strategies connect the crawl space to a building system.
These methods are not interchangeable. One contractor’s staged approach, for example, recommends sealing most vents while keeping an active exhaust opening; that differs from a fully sealed perimeter design (Crawl Space Ninja video).
The disagreement is a reason to require a defined design—not a reason to choose whichever vent rule sounds simplest.
Sealing vents is not a complete system
A closed crawl space generally combines:
- Bulk-water control
- A continuous ground cover
- Perimeter air control
- Managed wall and penetration transitions
- A deliberate humidity-control method
- Compatible insulation and HVAC arrangements
- Continued inspection access
Blocking vents while leaving wet soil exposed can leave the same moisture load in a space with less drying potential.
Use a pre-sealing safety gate
Before closing vents or converting a crawl space, ask qualified local professionals to evaluate:
- Whether atmospheric-combustion equipment uses crawl-space air
- Whether enclosure changes could affect combustion air or backdrafting, meaning exhaust gases spilling back instead of venting outdoors
- How furnaces, air handlers, returns, supplies, and ducts interact with the space
- Whether a radon test or mitigation plan applies
- How termite and pest inspection access will be maintained
- Whether electrical service and equipment clearances are suitable
- Which current building, mechanical, fuel-gas, and energy requirements apply
Commercial encapsulation guidance specifically identifies atmospheric-combustion appliances and older HVAC systems drawing from the crawl space as conditions requiring evaluation before enclosure (Northwest Crawl Space).
Verify the Repair and Know When to Bring in a Specialist
A finished installation is not necessarily a successful repair. New plastic can look clean while water continues entering beneath or above it.
Define success through performance over time.
Post-repair checklist
Confirm that:
- No standing water remains
- No plumbing or condensate line is actively leaking
- Gutters carry water without overflowing
- Downspouts and surface drainage move water away from the foundation
- Accessible drain inlets and outlets remain open
- The sump pump starts, stops, and discharges as intended
- Sump and condensate water do not return toward the house
- The ground liner remains intact
- Seams, penetrations, perimeter transitions, and support details remain secure
- No unexplained water is accumulating above the liner
- Previously wet insulation and framing are drying
- New materials were not installed over unresolved dampness
- Sensors remain in consistent, useful locations
- The dehumidifier drains reliably
- Filters and condensate lines remain accessible
Repeat the checklist after heavy rain. A drainage repair observed only during dry weather has not yet been tested under the conditions that produced the problem.
Compare measurements over time
Continue recording:
- Crawl-space temperature
- Relative humidity
- Outdoor weather
- Rain timing
- Visible condensation
- Wood-moisture readings at marked locations
- Pump operation
- Dehumidifier setting and runtime
- Odor and material changes
Look for sustained trends rather than one favorable afternoon.
Watch equipment behavior
A dehumidifier should be capable of maintaining the operating setting for which it was selected. Runtime will increase during humid or wet weather, but continuous unexplained operation warrants investigation.
Check whether:
- The displayed humidity reasonably agrees with an independent sensor
- The filter is clean
- Air circulates through divided areas
- The coil is frosting
- The unit makes unusual noise
- Condensate is draining
- A pump or drain line is blocked
- Vents, doors, or liner gaps are adding moisture
- Water has reappeared
- Capacity matches actual conditions
Do not respond automatically by lowering the setting or buying a larger machine. First determine whether the equipment is revealing unresolved water entry, air leakage, or maintenance trouble.
Inspect periodically
Periodically inspect:
- Ground and wall liners
- Seams, fasteners, and transitions
- Penetrations and supports
- Accessible foundation or perimeter drainage components
- Sump basin, pump, switch, and discharge
- Dehumidifier filter and coil
- Condensate drain or pump
- Humidity sensors and batteries
- Access doors and vent seals
- Plumbing and HVAC condensate lines
Add an inspection after major storms, plumbing work, foundation work, HVAC replacement, pest treatment, or any project that may disturb the liner or drainage system.
When to call a specialist
Arrange professional evaluation for:
- Recurring flooding or groundwater entry
- Persistent wall or footing seepage
- Hidden or unexplained plumbing leakage
- Major framing deterioration, displacement, or softness
- Cupped or buckled floors accompanied by framing concerns
- Extensive visible microbial growth
- Sewage or potentially contaminated water
- Wet or exposed electrical components
- Atmospheric-combustion equipment in a space being sealed
- HVAC equipment affected by a proposed enclosure
- Unresolved radon questions
- Drainage or discharge constraints requiring site-specific design
- Conditions that cannot be inspected safely
The appropriate person may be a licensed plumber, electrician, HVAC contractor, drainage specialist, structural engineer, qualified remediation professional, radon professional, or building-performance specialist. One contractor may not be qualified to resolve every part of the problem.
Questions to ask before approving work
Ask each bidder:
- What moisture pathway did you document?
- What observations or measurements support that conclusion?
- Is more than one pathway operating?
- Which water source will be corrected first?
- What does each proposed component control?
- What will the liner, dehumidifier, or encapsulation not fix?
- How will collected water and condensate be discharged without returning to the foundation?
- What combustion, HVAC, radon, electrical, inspection-access, and code reviews are needed before sealing?
- What maintenance will the system require?
- How will performance be measured after installation?
- What would indicate that the proposed remedy is insufficient?
- Who is responsible for confirming that wet materials continue drying?
Frequently Asked Questions
Will a dehumidifier fix crawl space moisture without encapsulation?
It can help without full encapsulation if major water sources have already been controlled. A practical partial system may include leak repair, corrected exterior drainage, a continuous ground cover, appropriate reduction of uncontrolled outdoor-air entry, and a properly selected dehumidifier with reliable condensate removal.
Dehumidification alone is unlikely to perform efficiently where the space remains exposed to standing water, foundation seepage, bare wet soil, or large amounts of humid outdoor air. Continuous runtime or failure to maintain the selected setting should prompt another source inspection before equipment is enlarged.
Should crawl-space vents be open or closed in humid weather?
There is no universal answer. If outdoor-air dew point is above the temperature of crawl-space surfaces, opening vents can add moisture and cause condensation. Outdoor air may help only when it is suitable for drying and ventilation is part of a deliberate plan.
The decision also depends on whether the crawl space is open pier-and-beam, wall-vented, or designed as a closed space. Do not change vent arrangements without evaluating combustion equipment, HVAC configuration, radon considerations, inspection access, and applicable local requirements.
What crawl-space humidity or wood-moisture reading is concerning?
No single relative-humidity value proves that damage will or will not occur. Interpret readings alongside temperature, dew point, rainfall, season, surface temperatures, and material-moisture trends.
Wood readings near 19–20% warrant investigation but do not prove decay. Confirm the reading, compare nearby members, and measure the same marked locations over time. Persistent condensation, rising readings, or failure to dry after source control is more informative than one isolated number.
Is a ground vapor barrier enough, or is full encapsulation necessary?
A ground barrier may be enough when exposed-soil evaporation is the main pathway, bulk water has been corrected, and the crawl-space design can otherwise manage humidity. It should provide durable, continuous coverage with appropriately handled seams, penetrations, and transitions.
Encapsulation is broader. It may combine floor-and-wall vapor control, perimeter sealing, drainage, insulation, and mechanical humidity management. It is more appropriate when a closed crawl space is being created or several persistent pathways require coordinated control.
Neither option replaces plumbing repair or bulk-water drainage.
When does crawl space moisture require professional help?
Seek professional help for recurring flooding, contaminated water, electrical exposure, unsafe access, persistent wall or footing intrusion, extensive visible growth, major framing deterioration, distorted floors accompanied by framing concerns, combustion equipment affected by enclosure, unresolved radon questions, or drainage requiring site-specific design.
Professional evaluation is also appropriate when the source remains unclear, wet materials do not dry after repairs, or a maintained dehumidifier cannot control conditions.
Document rain timing, water location, temperature, relative humidity, wood readings, equipment runtime, photographs, and previous repairs before the visit. That record can make the diagnosis more focused.
The most useful first purchase is not necessarily a liner or dehumidifier. It is a clear diagnosis. Document where and when moisture appears, stop leaks and bulk-water entry, reduce soil vapor, and make ventilation or enclosure decisions with climate and safety constraints in mind. Use dehumidification for the airborne moisture that remains, then verify the result after rain and through seasonal changes.
HVAC Lens describes its role as providing practical homeowner education rather than contractor advice (About HVAC Lens). This guide is general information; property-specific drainage, structural, electrical, microbial-remediation, combustion, radon, HVAC, and enclosure decisions should be confirmed by appropriately qualified professionals (HVAC Lens terms).